Install Elasticsearch
Installation
Select the OS Family
Execute the following commands to setup Elasticsearch for your OS:
sudo apt-get update
sudo apt-get install -y gpg wget
wget -qO - https://artifacts.elastic.co/GPG-KEY-elasticsearch \
  | sudo gpg --dearmor -o /usr/share/keyrings/elasticsearch-keyring.gpg

sudo apt-get install apt-transport-https
echo "deb [signed-by=/usr/share/keyrings/elasticsearch-keyring.gpg]\
 https://artifacts.elastic.co/packages/7.x/apt stable main" | \
  sudo tee /etc/apt/sources.list.d/elastic-7.x.list

sudo apt-get update
sudo apt-get install elasticsearch
title: "Elasticsearch Configuration" description: "Configure Elasticsearch for AxonOps. Search backend setup and optimization." meta: - name: keywords content: "Elasticsearch setup, AxonOps Elasticsearch, search backend"
Elasticsearch Configuration
Configuration File Locations
Most installations of Elasticsearch have the default configuration location at /etc/elasticsearch/.
The default location depends on whether the installation is from an archive distribution (.tar.gz or .zip file) or a package distribution (Debian or RPM packages). For more info on Elasticsearch configuration, please read Configuring Elasticsearch.
All commands on this page assume Elasticsearch was installed via a Debian or RPM package.
Other Default Locations
Depending on the installation method the default location for Elasticsearch configuration and binary files can change. Use these Elasticsearch docs for more information:
Configure Elasticsearch
Increase Bulk Queue Size
Increase the bulk queue size of Elasticsearch by running the following command:
echo 'thread_pool.write.queue_size: 2000' \
    | sudo tee --append /etc/elasticsearch/elasticsearch.yml
Increase Heap Size
Increase the default heap size of elasticsearch by editing /etc/elasticsearch/jvm.options.
Set Xmx and Xms to no more than 50% of the machine's physical RAM.
Elasticsearch requires memory for purposes other than the JVM heap and it is important to leave available memory (RAM) space for this.
Example
If you have 16 GB of physical RAM, change the settings from:
$ sudo grep 'Xm' /etc/elasticsearch/jvm.options
# -Xms4g
# -Xmx4g
to:
$ sudo grep 'Xm' /etc/elasticsearch/jvm.options
-Xms8g
-Xmx8g
In the above example, we set the minimum and maximum heap size to 8 GB.
Increase Log Compression
Set the following index codec by running the following command:
echo 'index.codec: best_compression' \
    | sudo tee --append /etc/elasticsearch/elasticsearch.yml
Increase Number of Available Memory Maps
Elasticsearch uses an mmapfs directory by default to store its indices.
The default operating system limits on mmap counts is likely to be too low, which may result in out of memory exceptions.
To increase the limits, run the following command:
sudo sysctl -w vm.max_map_count=262144
To make this change persist across reboots run this command:
echo "vm.max_map_count = 262144" \
    | sudo tee --append /etc/sysctl.d/10-elasticsearch.conf
Increase Number of File Descriptors
Note: This section is only required for non-package installations. Debian and RPM packages already use the intended value.
Elasticsearch needs max file descriptors system settings to be at least 65536,
which can be updated with this command:
sudo mkdir -p /etc/security/limits.conf.d
echo 'elasticsearch  -  nofile  65536' \
    | sudo tee --append /etc/security/limits.conf.d/elastic.conf
Enable Security Features
Enable the Elasticsearch security features to enable basic authentication. Basic authentication is available as part of the basic Elasticsearch license, but disabled by default.
Run the following command to allow access to the cluster using username and password authentication:
echo 'xpack.security.enabled: true' \
    | sudo tee --append /etc/elasticsearch/elasticsearch.yml
Start Elasticsearch
sudo systemctl enable elasticsearch.service
sudo systemctl start elasticsearch.service
After a short period of time, it is possible to verify that the Elasticsearch node is running by sending an HTTP request to port 9200 on localhost:
curl "localhost:9200"
Securing Elasticsearch
Set Passwords for Default User
In the Elasticsearch home folder run one of the following commands to setup the default passwords for the built-in elastic user.
This command creates a random secure password:
echo y | /usr/share/elasticsearch/bin/elasticsearch-setup-passwords auto
This command sets a self-assigned password:
/usr/share/elasticsearch/bin/elasticsearch-setup-passwords interactive
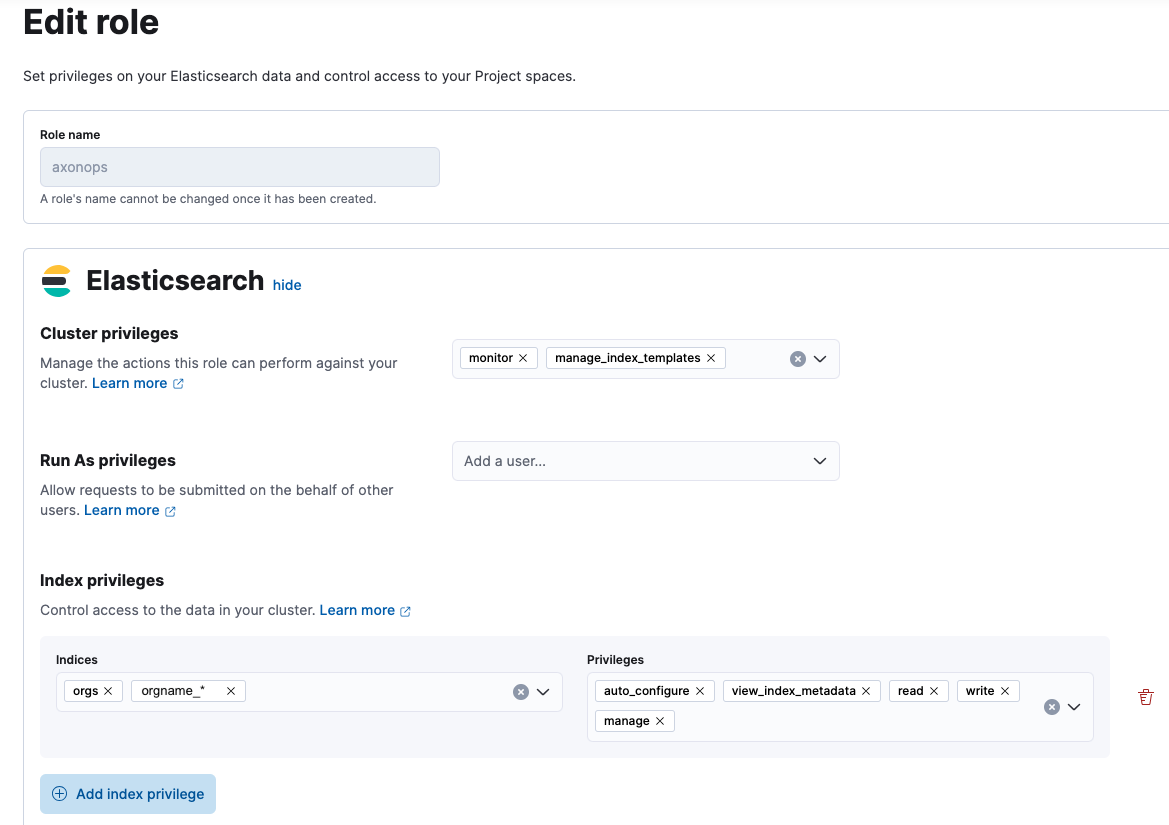
Create a Dedicated Role
When creating a dedicated AxonOps role in Elasticsearch, the following privileges are required:
- Cluster privileges:
monitormanage_index_templatesmanage_ilm
- Index privileges:
auto_configuremanagereadview_index_metadatawrite
The index privileges should be applied to the following indices:
orgsorgname_*- Where the
orgnameprefix should match theorg_namevalue in the AxonOps server and agent config files.
- Where the
Advanced User Setups
You can learn more about other User Authentication options using the Elastic's official documentation.